Using GeoPoints
Parse allows you to associate real-world latitude and longitude coordinates with an object. Adding a ParseGeoPoint to a ParseUser, you will be able to easily find out which user is closest to another, show the locations of the users of your app and also store the user’s location information, among other possibilities.
You can also associate a ParseGeoPoint to any ParseObject. For example, if your app is associated with a store with physical affiliates, you will be able to create an activity to show the location of those stores or to show the user which store is closest to him. Another example of this association usage: if your app is a game in which you created ParseObjects to represent characters, adding ParseGeoPoints to these characters would allow them to be shown along the player’s path.
This tutorial explains how to use some features of ParseGeoPoint through Back4App.
After following this tutorial, you will be able to do this:
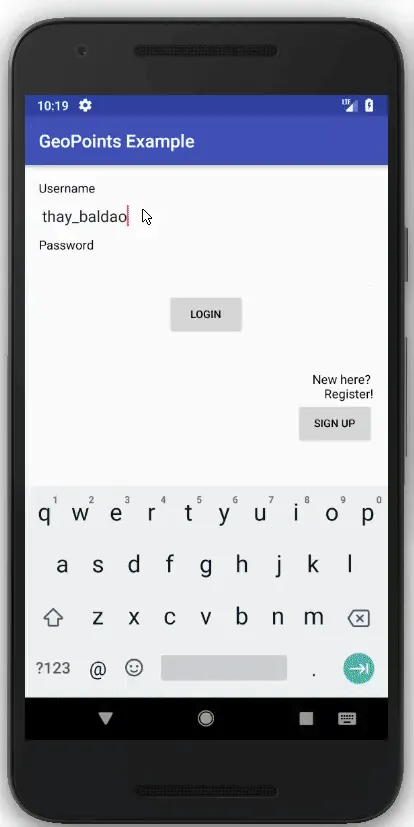
At any time, you can access the complete Android Project built with this tutorial at our GitHub repository.
To complete this tutorial, we need:
- An User Registration - Login App created on Back4App.
- Note: Follow the User Registration - login tutorial to learn how to create an User Registration - Login App on Back4App. .
- A real device running Android 4.0 (Ice Cream Sandwich) or newer.
- Note: It is very likely that the app built with this tutorial won't run as expected in a virtual device and may even crush because it might not retrieve the current location of the virtual device. So we strongly recommend that you use a real device to run it.
To show the location you stored in a ParseGeoPoint, you will need to display a Map. To do that, it’s interesting to use a Google Maps Activity. In order to create a Google Maps Activity in Android Studio, do the following:
- Go to File > New > Google > Google Maps Activity. Then, automatically, it will create a java file, a layoutfile and a values file corresponding to the Google Maps Activity that you have created.
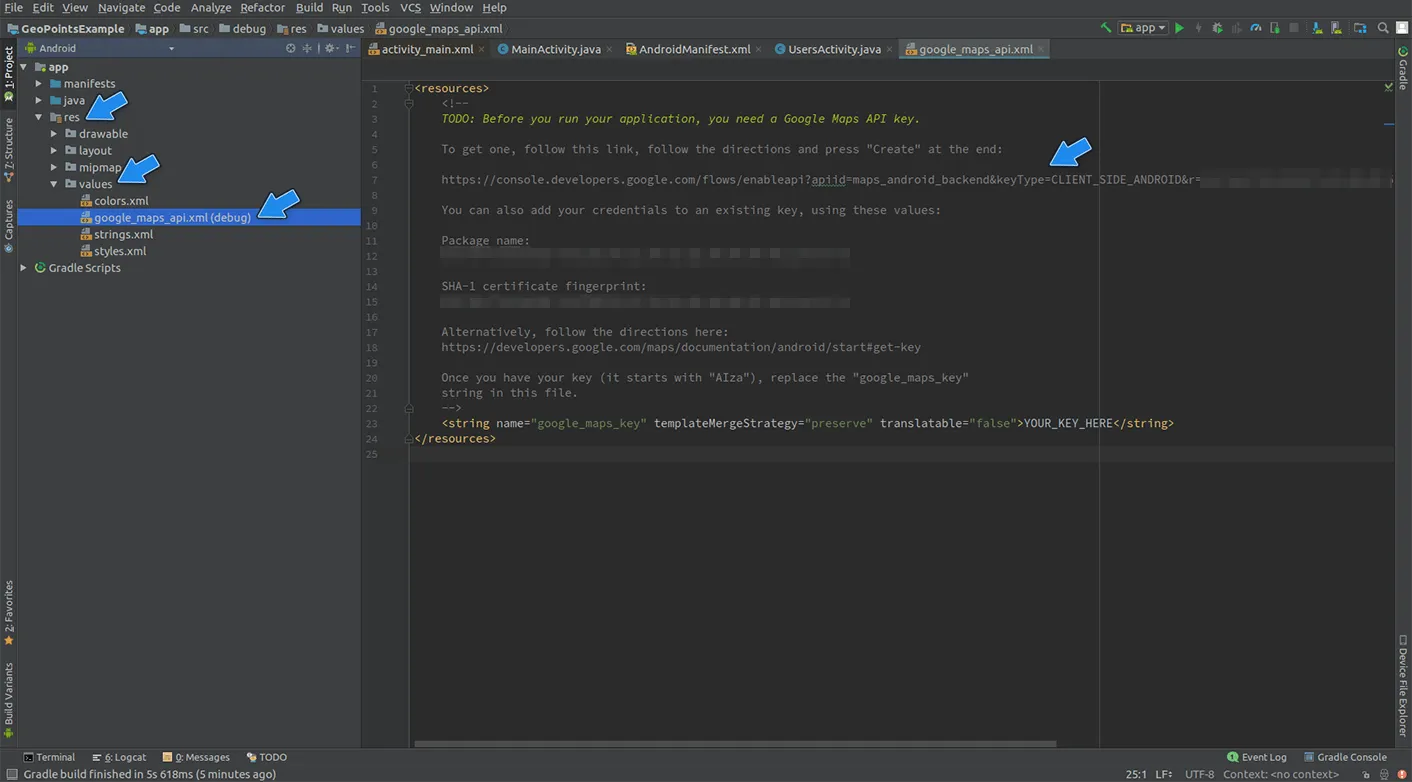
- Go to the created values file (you can do this by accessing app > res > values > google_maps_api.xml), as shown in the image below. This file will give you some instructions on how to get a Google Maps API Key. Basically, you should open the link shown in the image.
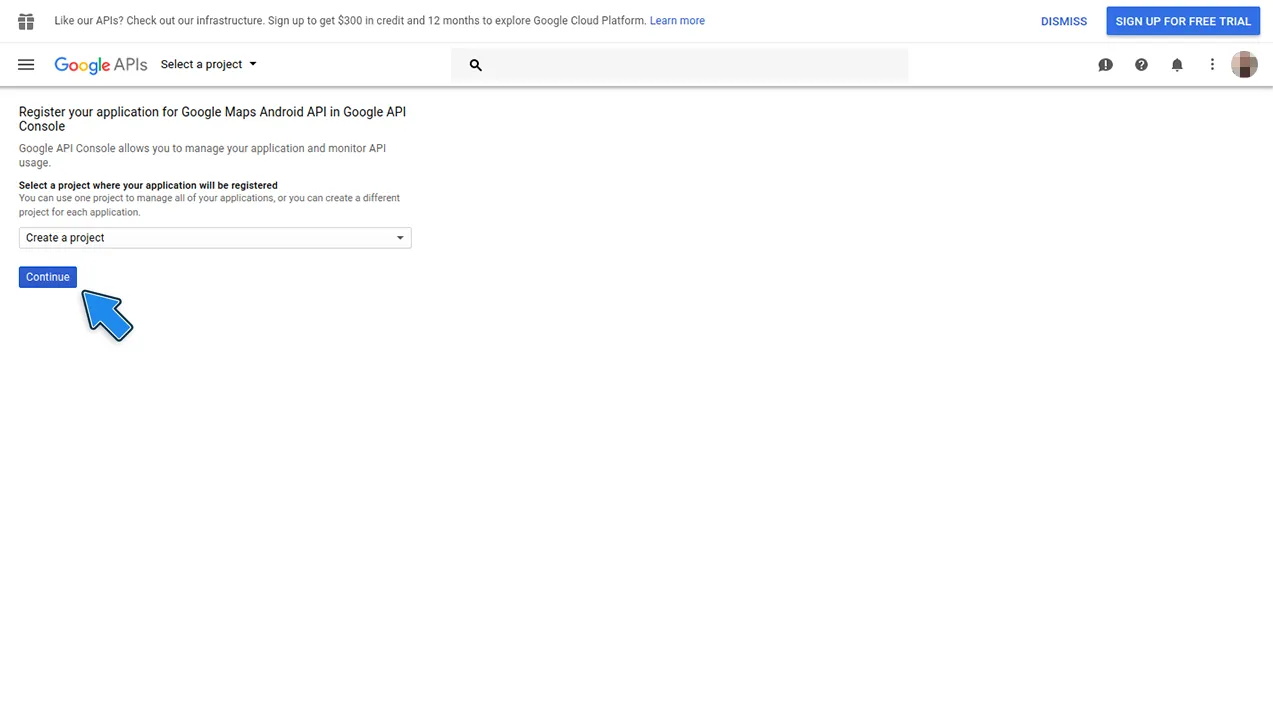
3. After opening it, you should login in your Google Account, select the Create a project option and click on Continue. While creating the project, Google will enable your API.
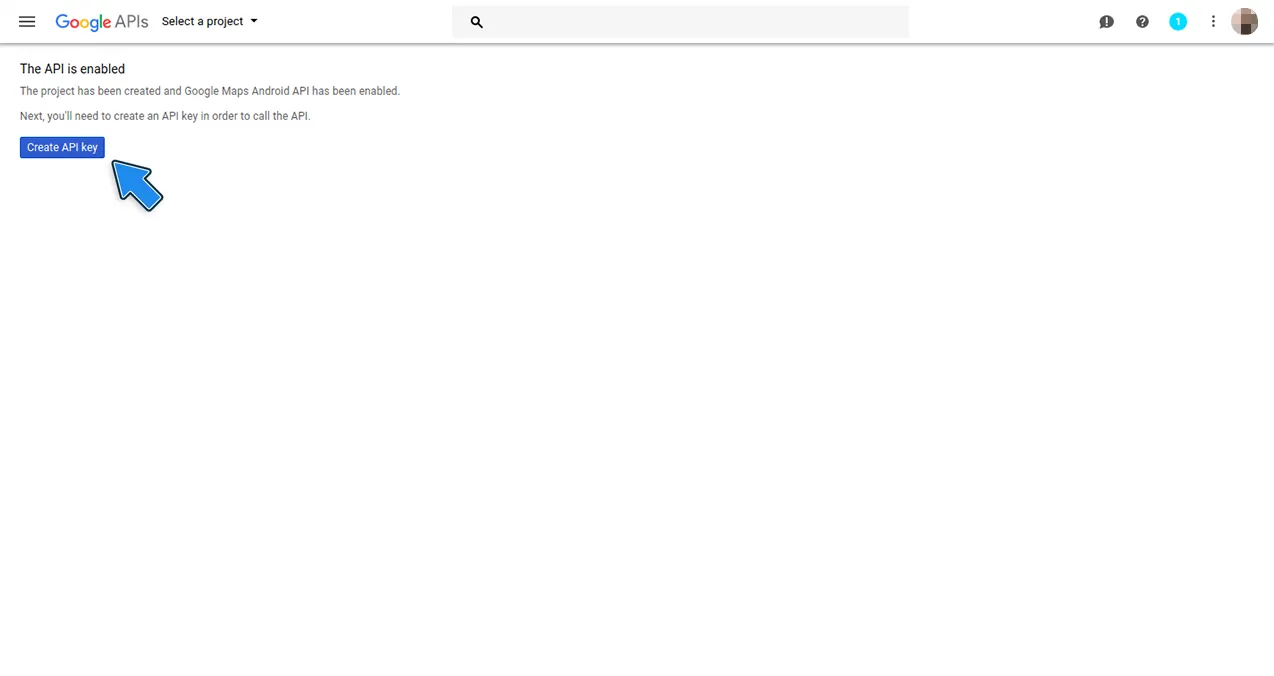
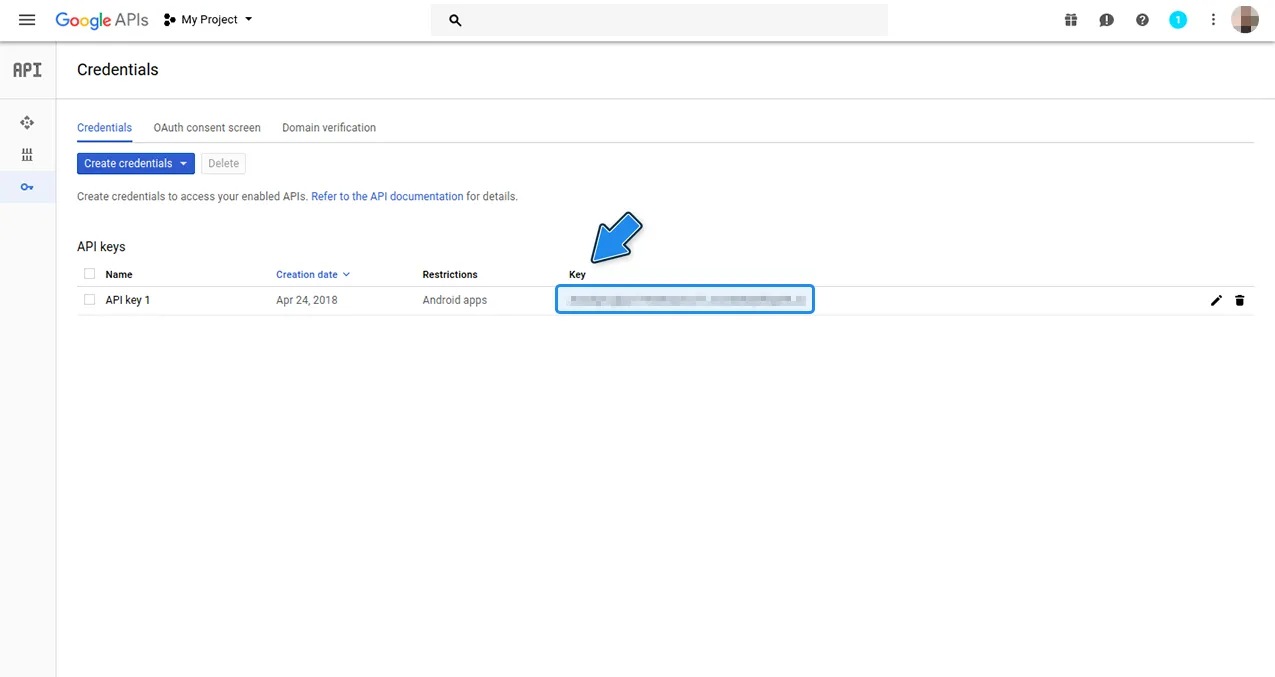
4. After your API is enabled, you will be able to get an API key, to do so click on
5. Then, your key will be created and you can copy it and paste it in the values file that lead you to this page, in the place where its written YOUR KEY HERE.
6. It’s important to have the uses-permission below in your AndroidManifest.xml file. If you created the Google Maps Activity following the instructions above, then one of these permissions should already be in your manifest, anyway, you’ll need both of them for your app to work properly, so check if they are in your AndroidManifest.xml file, otherwise, insert them on it.
7. At the beginning of your MapsActivity, import the following:
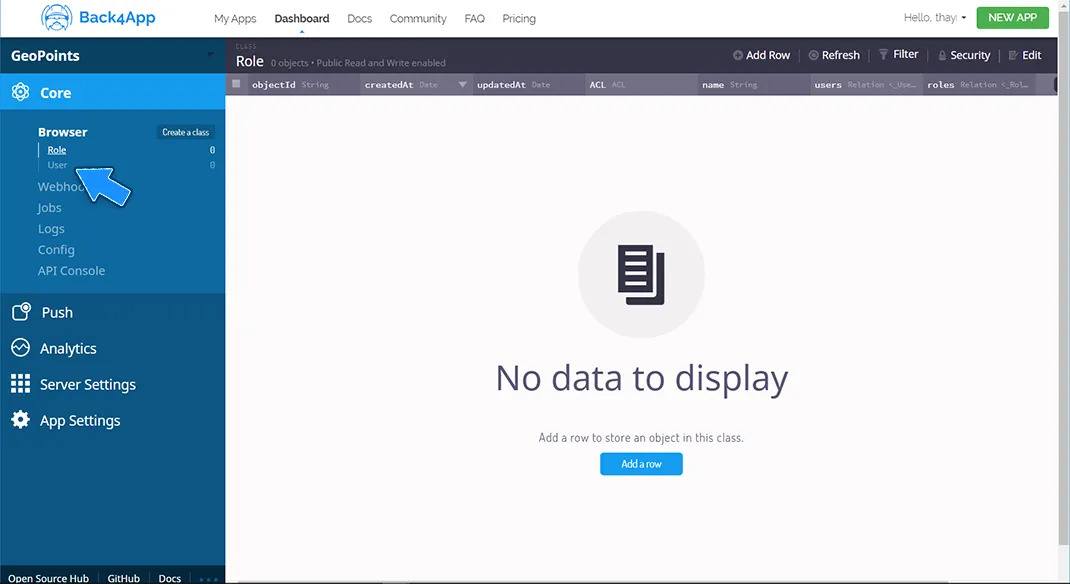
- Go to Core > Browser > User, as shown in the image below.
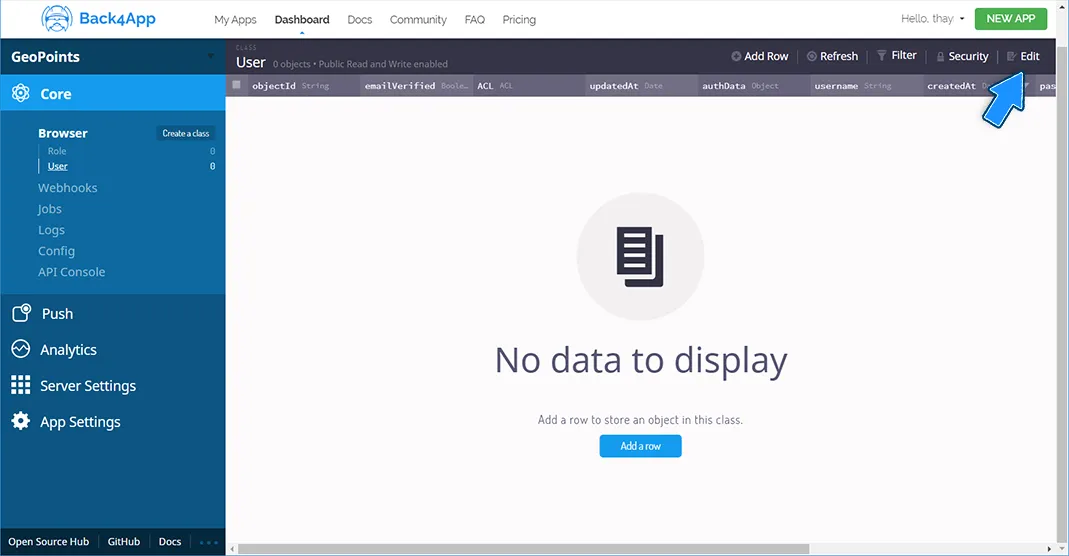
3. Now, create a new column to save the user’s location. To do so, click on the Edit button in the top right, as shown below.
4. Then, click on Add a column.

5. In the field What type of data do you want to store?, choose the GeoPoint option.
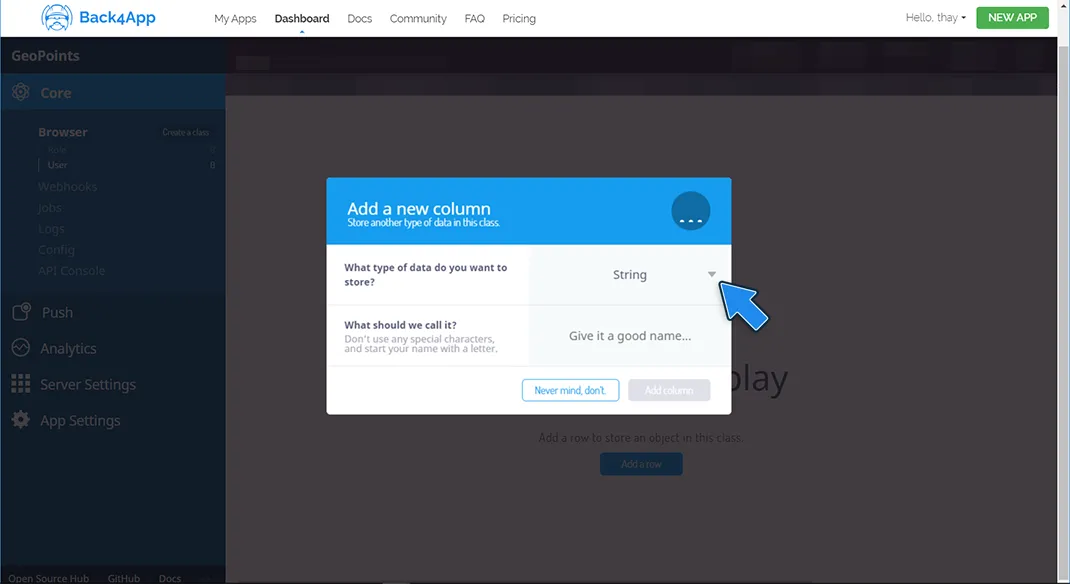
6. In the field What should we call it?, type “Location”.
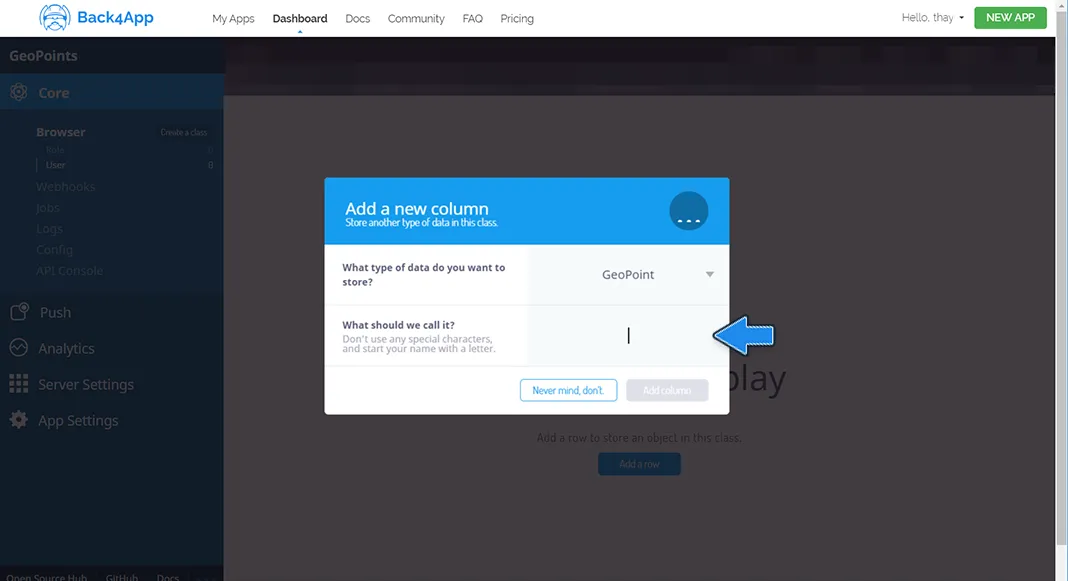
7. So, click on Add column, as shown in the image below.
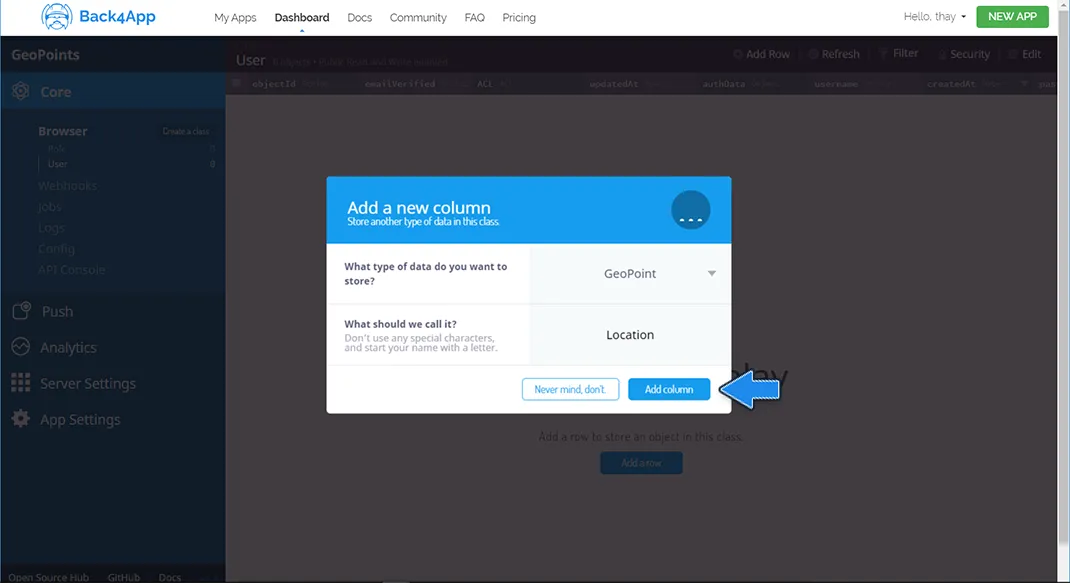
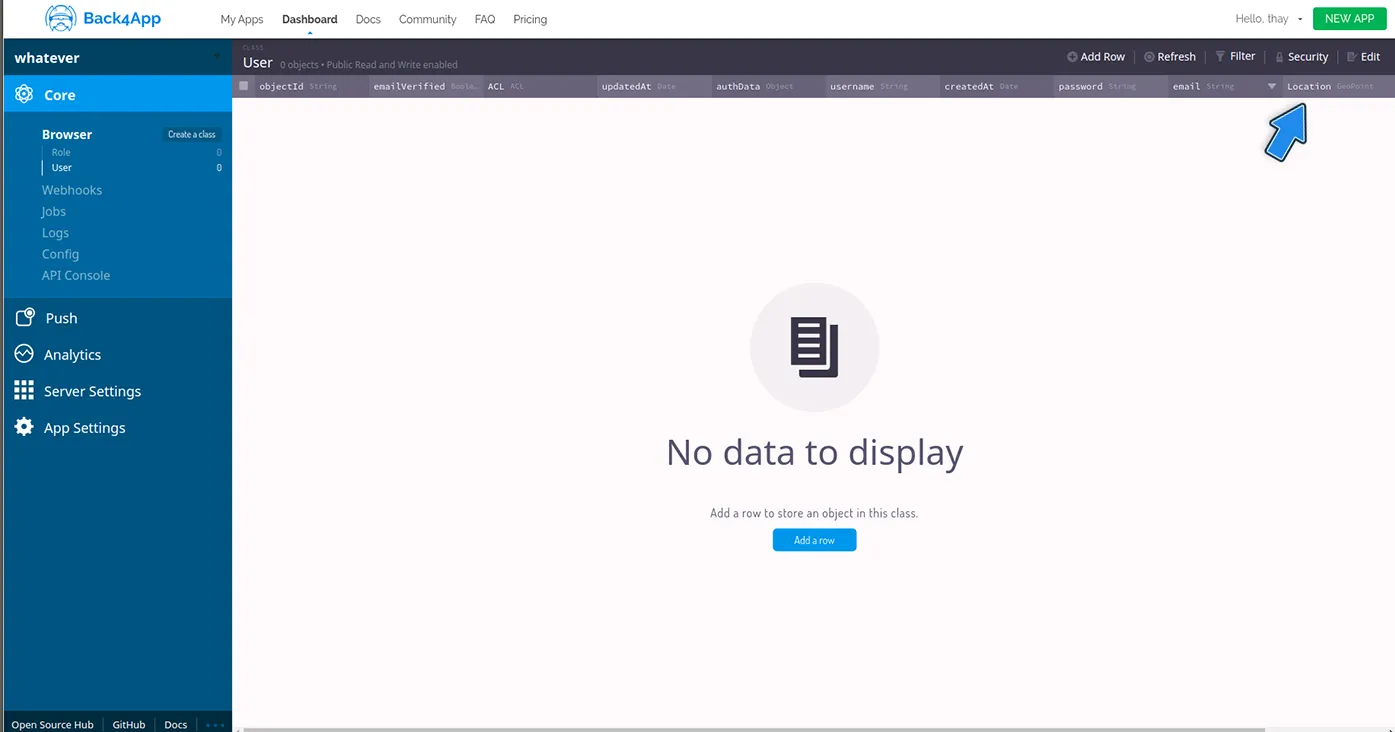
8. Now, your app is able to store location data of users and your User Class in your Back4pp Dashboard should look like this:
- Open your MapsActivity and inside the public class MapsActivity define an int called REQUEST_LOCATION with value 1 and a locationManager, as in the following code.
2. In the onCreate method create the locationManager, as in the following code.
3. To save user’s location in your Back4pp Dashboard, simply implement the following method and call it in your onMapReady method.
4. It’s really important to implement the following method in order to make saveCurrentUserLocation method works.
To retrieve user’s location, you’ll need to find who is the current user, save its location and then return the location saved in your Back4App Dashboard. In order to do that, implement the following method in your MapsActivity and call it when needed.
To display user’s location in the map, you’ll need to retrieve user’s location and then create a marker in the map using the information retrieved. In order to do that, implement the following method in your MapsActivity and call it in the onMapReady method.
- Now that you have a bunch of users with spatial coordinates associated, it would be good to find out which user is closest to another. This can be done by using a ParseQuery. First, you’ll need to create a ParseUser query and restrict it with whereNear, informing in which column of the User class on Back4App you are doing the query (in this case the “Location” column) and also inform the reference ParseGeoPoint for the query from which will be found the closest user (in this case the ParseGeoPoint associated to the current user location). The following code do that:
2. You can limit the number of results of this query adding to it the restriction setLimit. By default, results are limited to 100. As the whereNear restriction will make the query retrieve an array of users ordered by distance (nearest to farthest) from currentUserLocation, setting the limit of close users to find to the number 2, the list of results of the query will only have two users: the current and the closest user from him. The following code set the limit of results to 2:
3. Now that you restricted your query, let’s retrieve its results. In order to do that, you will call a findInBackground method and pass as argument a List of users, in which it’ll be stored the results of the query and also a ParseException to handle errors. To avoid errors, don’t forget to clear cached results after the query run. The following code do that:
4. If no error occurs, you’ll have in the nearUsers list the two closest users to the current user (the actual current user and the closest user from him), now you’ll only have to find who isn’t the current user. To do that, inside the if (e == null) block use the following code:
5. Now that you know who is the closest user to the current one you can mesure the distance between them using the distanceInKilometersTo method. In order to do that, use the following code:
The alertDisplayer method used above, is the following:
6. You can also show both users in the map, using the following code:
The complete method that executes all 6 steps above is the following:
Supose that the example app you are builiding is associated with a group of stores with physical affiliates. It would be interesting to show all the physical affiliates of this store in the map. In order to do so create a Stores class on Back4pp Dashboard, save the existing stores as ParseObjects, their locations and after that the app will be able to query the physical affiliates and display their possitions on the map. The following steps will help you with that. 1 . Go to Back4App website, login, find your app and open its Dashboard. 2. Go to Core > Browser > Create a class, as shown in the image below.
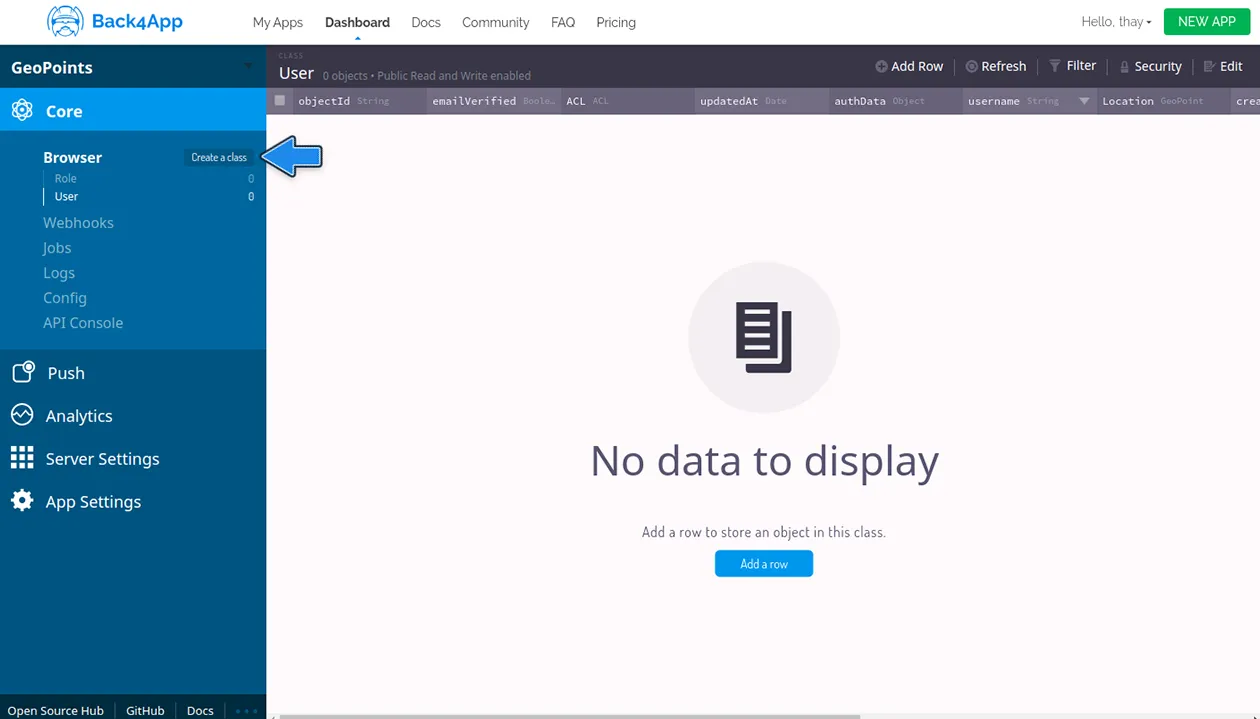
3. In the field What type of class do you need?, choose the Custom option.
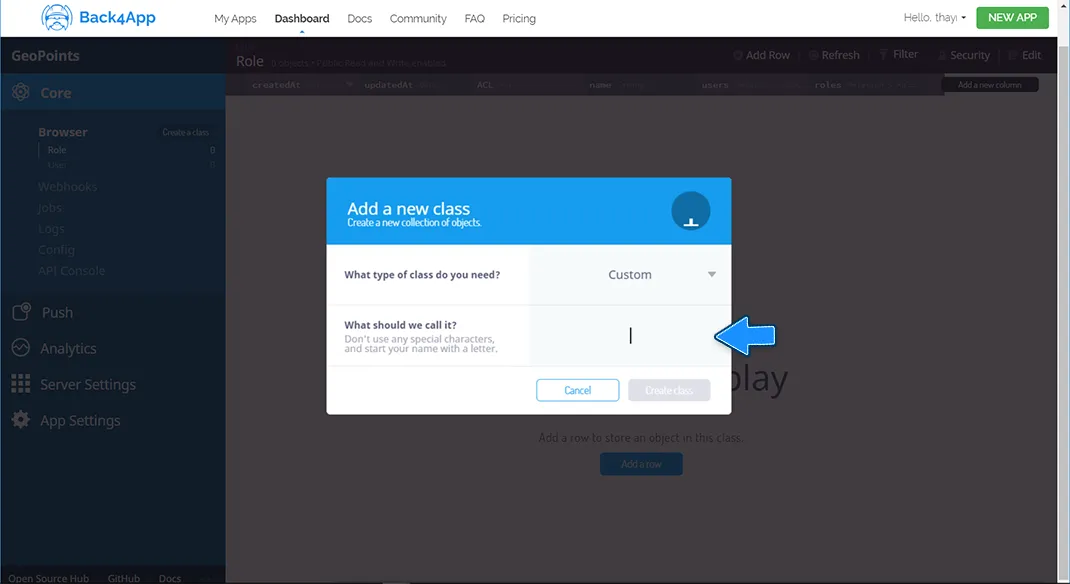
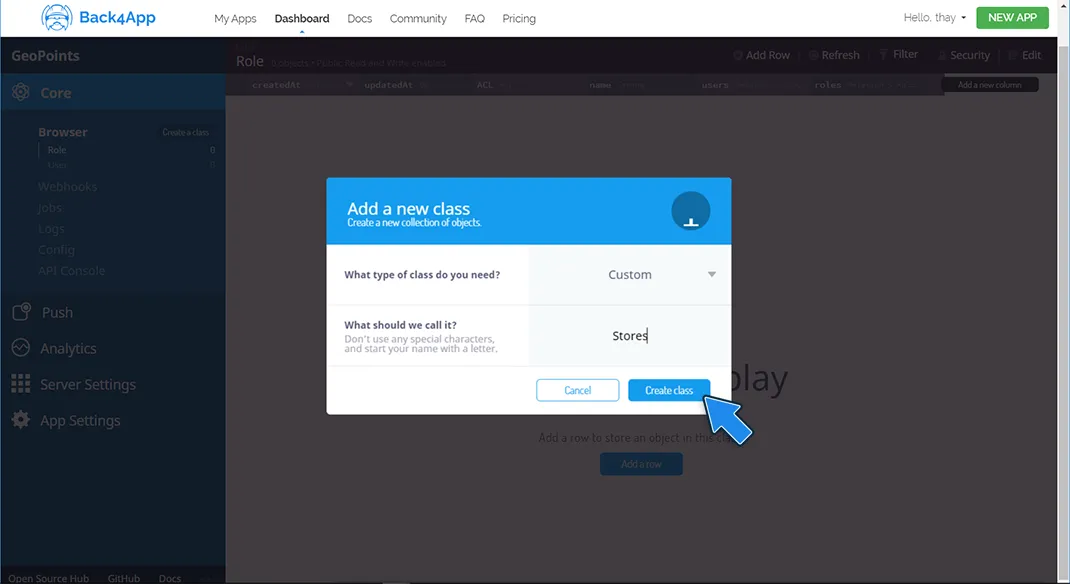
4. In the field What should we call it?, type “Stores” and then click on Create class button.
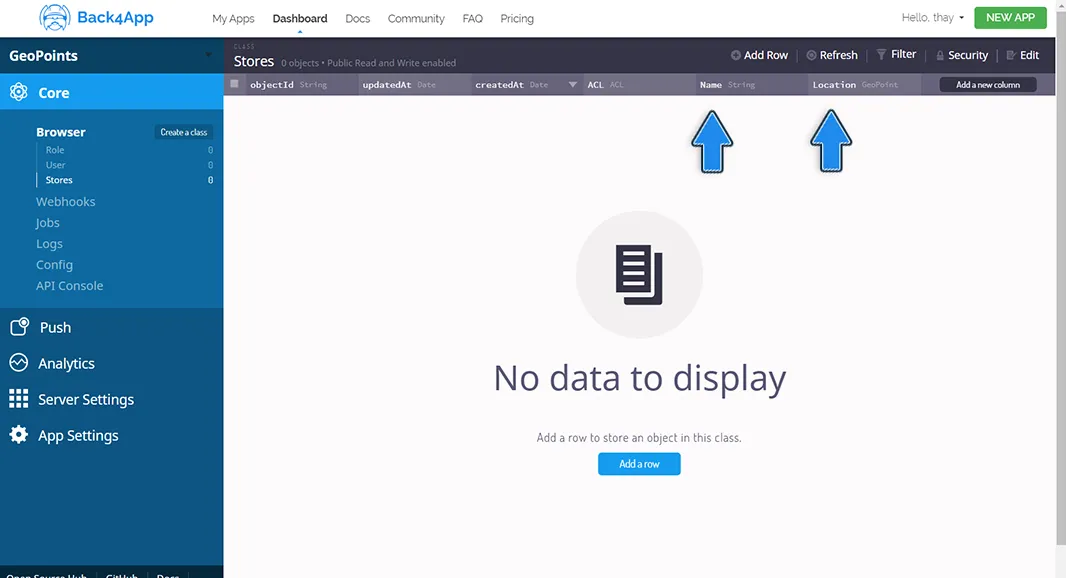
5. Then a new class called “Stores” will be shown and you should insert 2 columns on it: a collumn with data type String called Name, as well as another column with data type GeoPoint called Location. If you don’t remember how to create a column, go back to Step 2, there it’s explained how to create a column at Back4App Dashboard. Your class should end up like this:
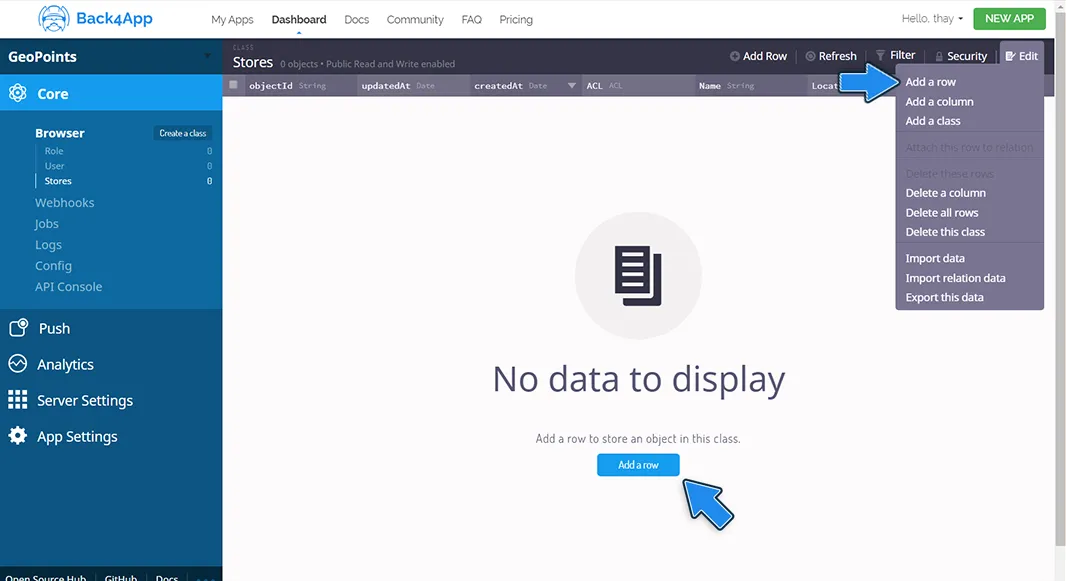
6. Now, fill this class with information. To do so, click on Add a row button in the menu on the top right or in the middle of the page, as shown in the image below.
7. Then fill the row with the informations required: the name of the store and its latitude and longitude. After inserting some data, your Stores class should look like the image below. If you want to insert more data, you can click on the Add a row button on the top, or in the + button bellow the last row of data.
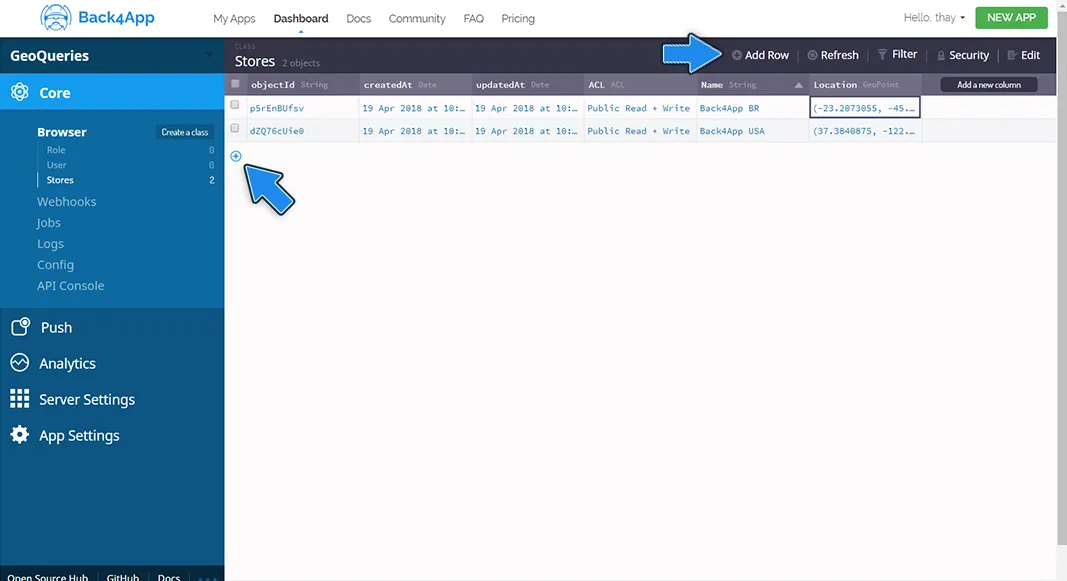
Now you are ready to use the location information of the stores in your app.
1. You can show all the stores you added to your class on the MapsActivity by using a ParseQuery. First, you’ll need to create a ParseObject query, informing the name of the Back4pp Dashboard class you want to query (in this case the “Stores” class), and restrict it with whereExists, informing the column of the Store class on Back4App you are doing the query (in this case the “Location” column). The following code do that:
-
2. Now that you restricted your query, let’s retrieve its results. In order to do that, you will call a findInBackground method and pass as argument a List of stores, in which it’ll be stored the results of the query and also a ParseException to handle errors. The whereExists restriction will make only the ParseObjects of the class that have a ParseGeoPoint associated to them indicating their location be stored in the list of stores. To avoid errors, don’t forget to clear cached results after the query run. The following code do that:
3. If no error occurs, you’ll have in the stores list all the stores with location associated, now you’ll only have to make a loop to display them on the map. To do so, inside the if (e == null) block use the following code.
The complete method that executes all 3 steps above is below. Call it on the onMapReady method for it to work.
1. Now that you have a bunch of stores with spatial coordinates associated, it would be good to find out which store is closest to a user. This can be done by using a ParseQuery. First, you’ll need to create a ParseObject query, informing the name of the Back4pp Dashboard class you want to query (in this case the “Stores” class), and restrict it with whereNear, informing the column of the Store class on Back4App you are doing the query (in this case the “Location” column). The following code do that:
2. You can limit the number of results of this query adding to it the restriction setLimit. By default, results are limited to 100. As the whereNear restriction will make the query retrieve an array of users ordered by distance (nearest to farthest) from currentUserLocation, setting the limit of close users to find to the number 1, the list of results of the query will only have one store: the closest to the current user. The following code set the limit of results to 1:
3. Now that you restricted your query, let’s retrieve its results. In order to do that, you will call a findInBackground method and pass as argument a List of store obejcts, in which it’ll be stored the results of the query and also a ParseException to handle errors. To avoid errors, don’t forget to clear cached results after the query found any result. The following code do that:
4. If no error occurs, you’ll have in the nearStores list the closest store to the current user, now you’ll only have to display it on the MapsActivity. To do that, inside the if (e == null) block use the following code:
The alertDisplayer method used above, is the same of the Step 6 (Finding the closest user to the current one).
The complete method that executes all 4 steps above is the following:
1. Login at Back4App Website
2. Find your app and click on Dashboard > Core > Browser > User and create some users with location associated to them to allow the method showClosestUser to work.
3. Run your app in a real device and sign up an account. Try every feature!
4. Go back to Back4pp Dashboard and verify if your location is stored in your user row.
At this stage, you can use some features of ParseGeoPoint through Back4App!