Install Parse SDK
In this section you learn how to install Parse Android SDK into your Android Studio project.
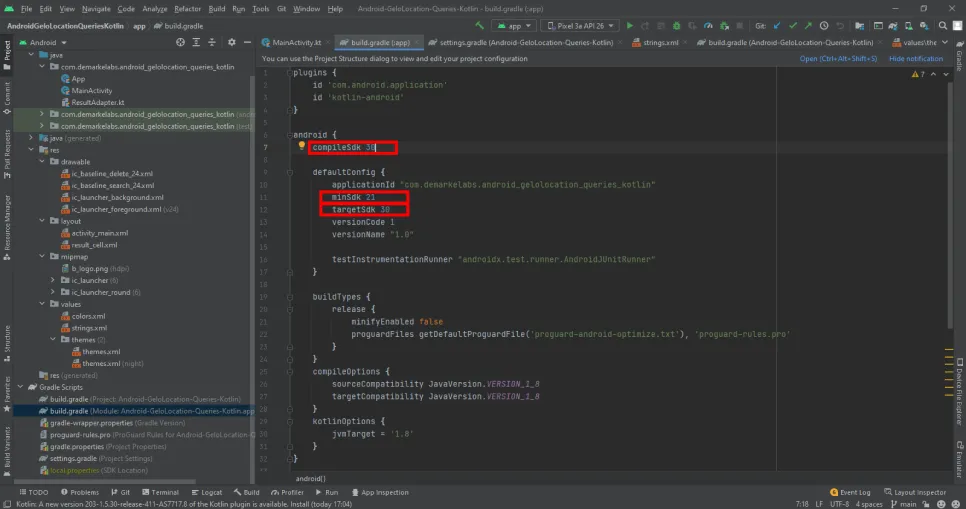
This tutorial uses a basic app created in Android Studio Arctic Fox 2020.3.1 Patch 1 with compileSdk 30 , minSdk 21 and targetSdk 30
At any time, you can access the complete Android Project built with this tutorial at our Github repositories
Learn how to install Parse-SDK on your Android project.
To complete this section, you will need:
- An app created at Back4App.
- Note: If you don’t have an app now please follow the New Parse App tutorial to learn how to create a Parse app at Back4App.
- Basic android app.
- Note: If you don’t have a basic app created you can follow the Create a Project tutorial from Android Studio official website.
Note: Parse Android SDK works with compileSdk 27 and targetSdk 27 or higher.
We need to implement Parse SDK to our Android project for this we will use Gradle, an open-source build automation tool that is designed to be flexible enough to build almost any type of software. Android Studio uses Gradle for build process and import external libraries like Parse SDK.
1 - In your Android Studio project, open your settings.gradle file.
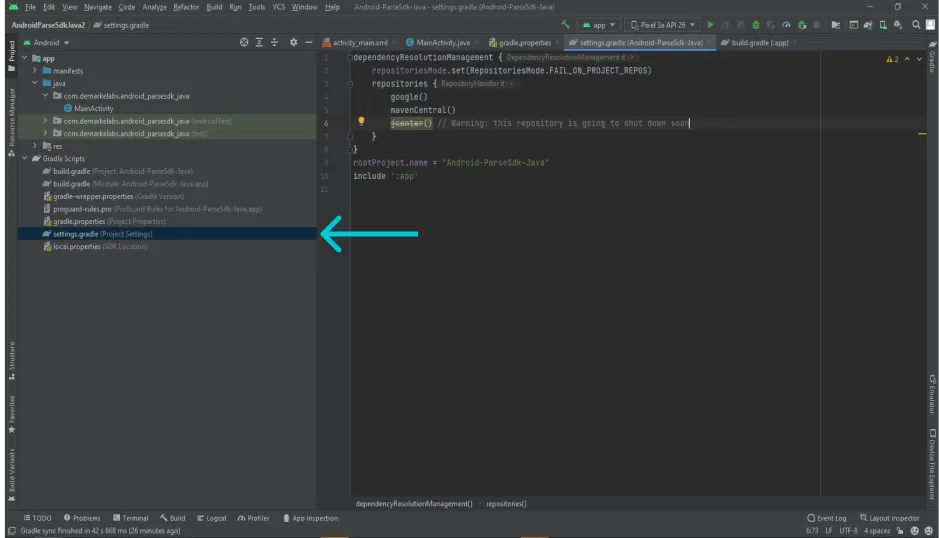
Now we will add Jitpack to our Project. Jitpack is a package repository for JVM and Android projects.
2 - Now we need to add maven {url 'https://jitpack.io'} line to repositories{} tag in the settings.gradle file:
3 - It’s also necessary to look in the android{} tag if your compileSdk is 27 or higher and also if your targetSdk is 27 or higher. If they aren’t, you must change these versions to 27 or higher, otherwise your Parse SDK for Android may not work properly. After checking this, your build.gradle (Module:app) should look like the one in the image below.
4 - If all previous steps are set now we are able to add Parse Android SDK to our project.
implementation "com.github.parse-community.Parse-SDK-Android:parse"
In dependencies{} tag change the latest-version-here value with version of your choice. It will look like this:

You can see current version of SDK in here SDK Versions.
5 - Now we need to sync our build.gradle to last changes to effect our project.
To learn more about adding support libraries to your Android Studio Project, see the Android Studio’s Support Library Setup page.
Now it is time to use Android Parse SDK in action. We need internet access and server credentials to connect to Back4App.
To use Parse SDK, our application need to have access to the internet network. To allow our app to have it, we need to grant permissions in the AndroidManifest.xml file. Also, we have to set up the app’s credentials to connect our app to Back4App. For achiving this we need to follow the steps below.
1 - Go to app > manifests > AndroidManifest.xml in your Android Studio Project.
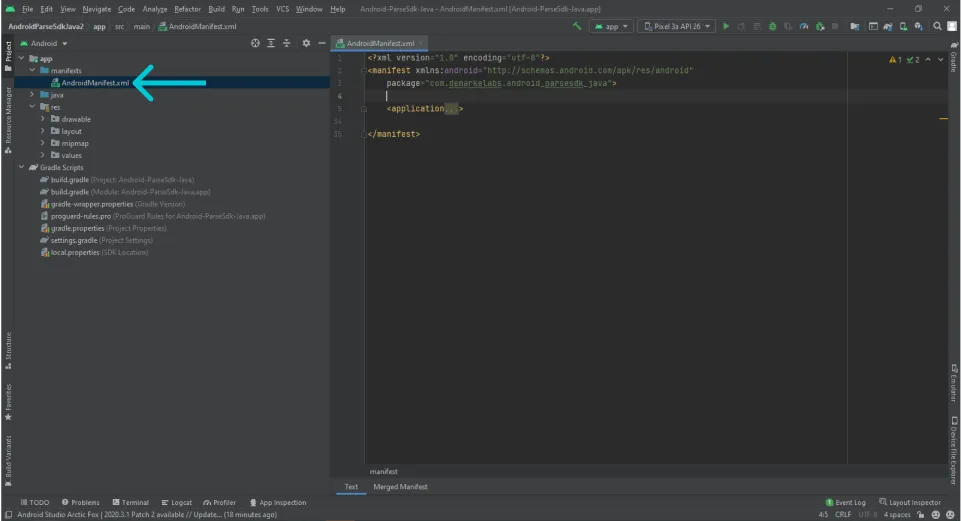
2 - Now, before the application tag in the AndroidManifest.xml file, copy the following code snippet:

3 - Inside the application section of the AndroidManifest.xml file, add the following code:
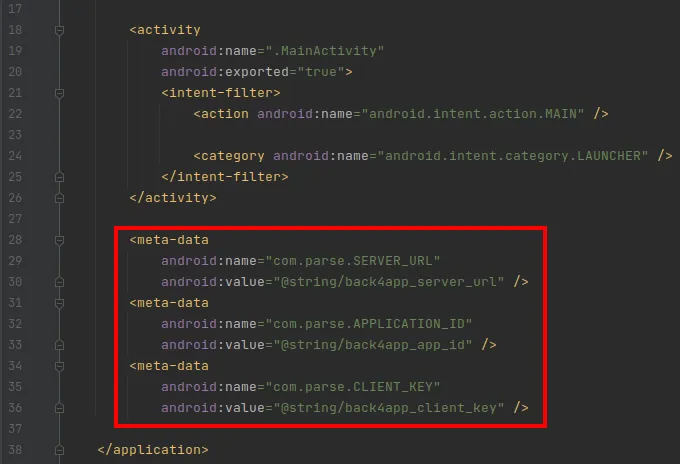
4 - Go to app > res > values > strings.xml file.
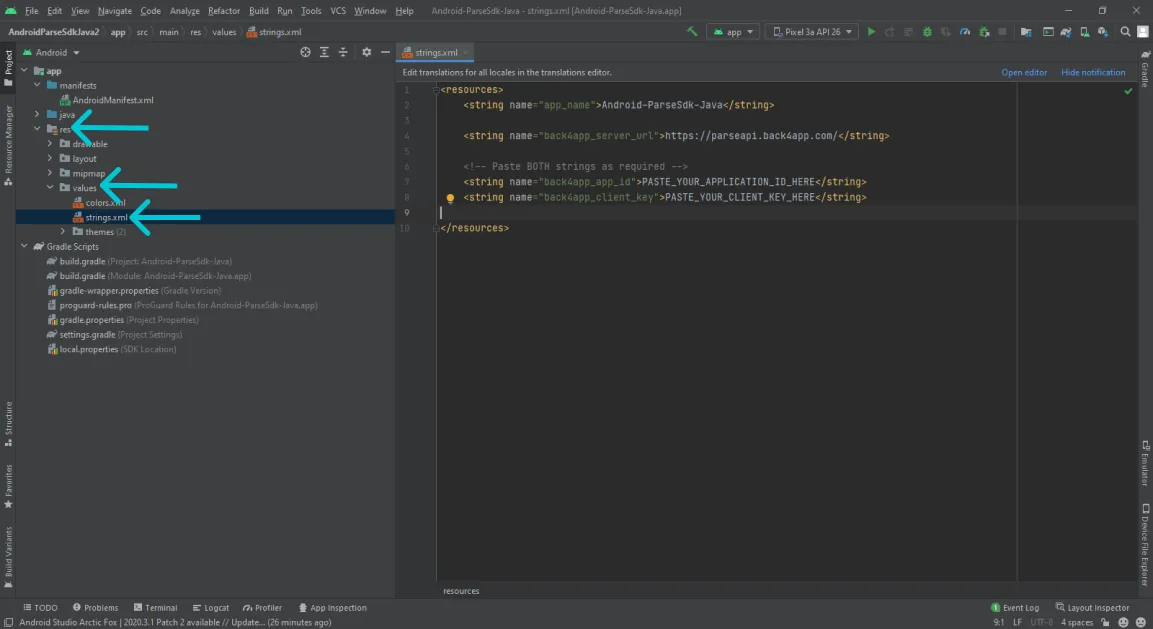
5 - In the strings.xml file, add the following code:
6 - Leave the string.xml opened and go to Back4App Website. Now you will find your keys to replace in the code. Go your Dashboard and then click on App Settings > Security & Keys.
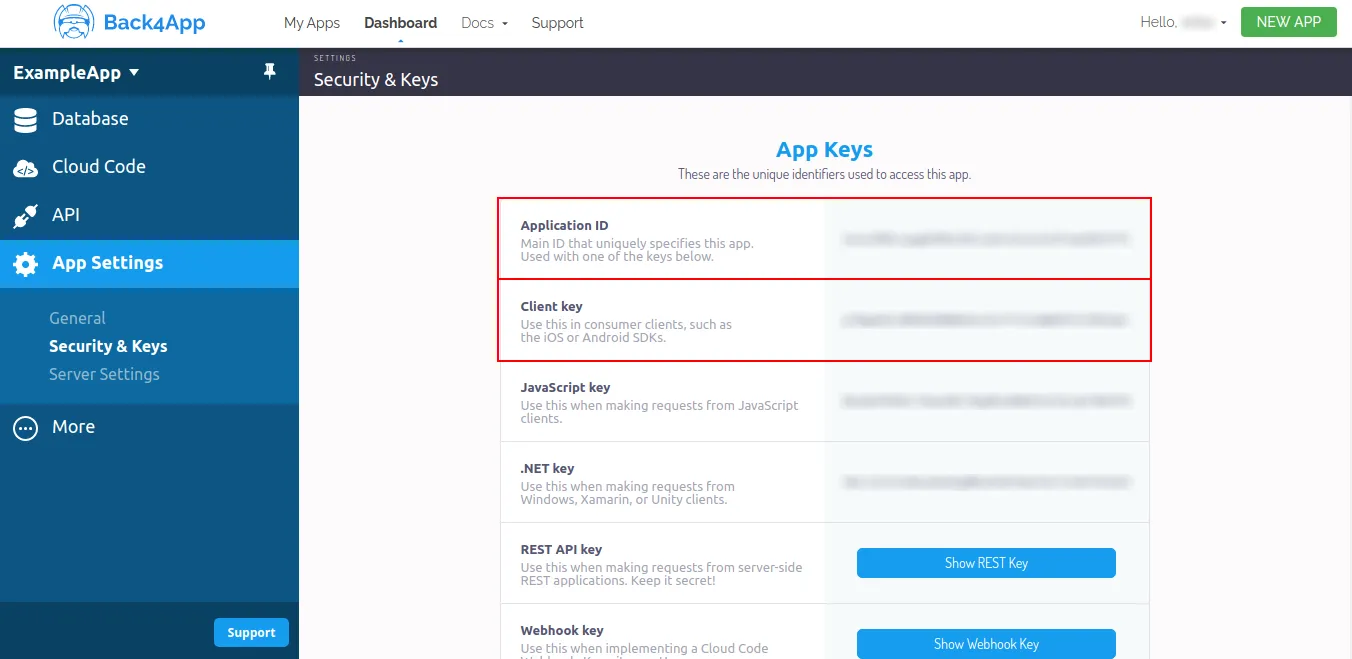
In this step we will complete the Parse Initialization using App Id and Client key which we have obtained at the end of Step 2.
We recommend you to write the installation codes in the App.java or App.kt files which you will create. The reason for this, to ensure that our Parse SDK initialize codes will work before any other Activity or Context, Application Context is the first that creates and last destroy. So, create the App.javain the same folder as your MainAcitivty, and then follow the steps below:
1 - Import parse library to your App file:
2 - Inside App file call the following code:
Please check the image below as an example using Java:
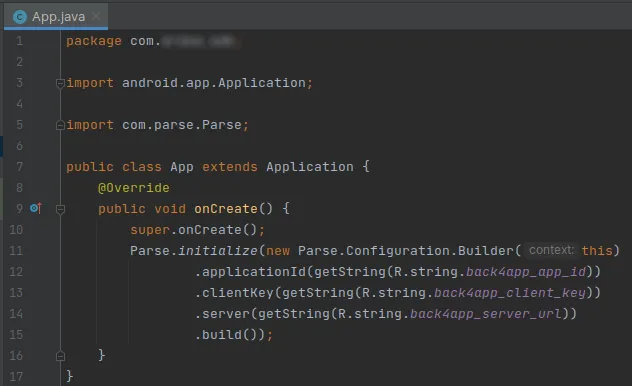
We put our code to onCreate() method because we want to connect to our server first before taking any other action.
Don’t forget to define this file in the AndroidManifest.xml. For doing this, go to the AndroidManifest.xml file and add the following line of code inside the applicationtag:
android=".App"
At the end, your AndroidManifest.xml should look like this:
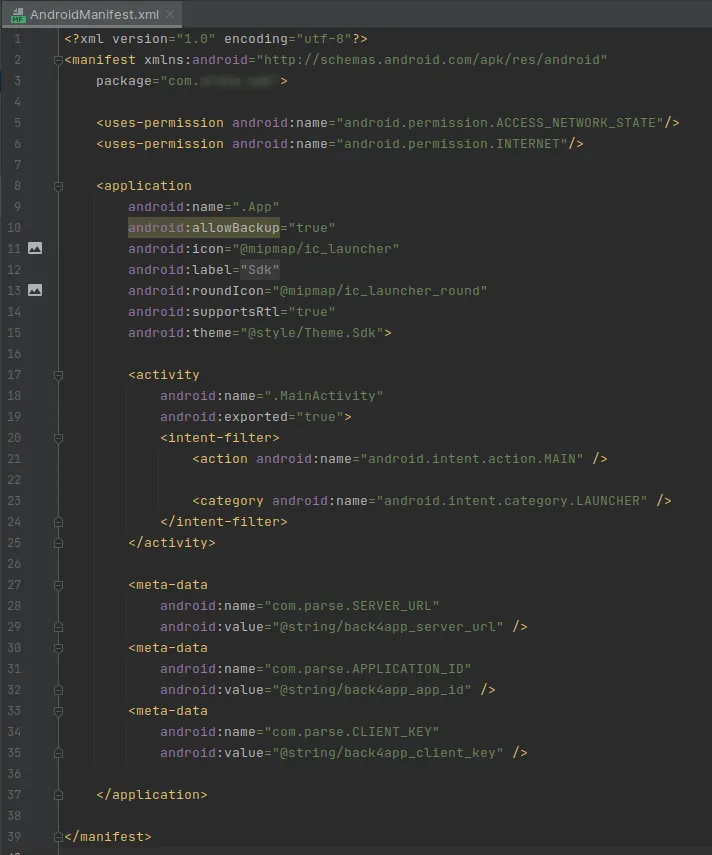
If the name of the java file that extends Application that you created on the previous step isn’t “App”, don’t forget that the code above should have the correct name of the file (android:name=".name_of_the_file").
To test your connection with Parse SDK, let’s save an object in the MainActivity of your Android Studio Project.
1 - Go to your Android Studio Project and add the following code to your onCreate() method in order to save your first Parse Object of the application into your Dashboard.
2 - Launch your app and go to Back4App Website. Find your app and go to its Dashboard.
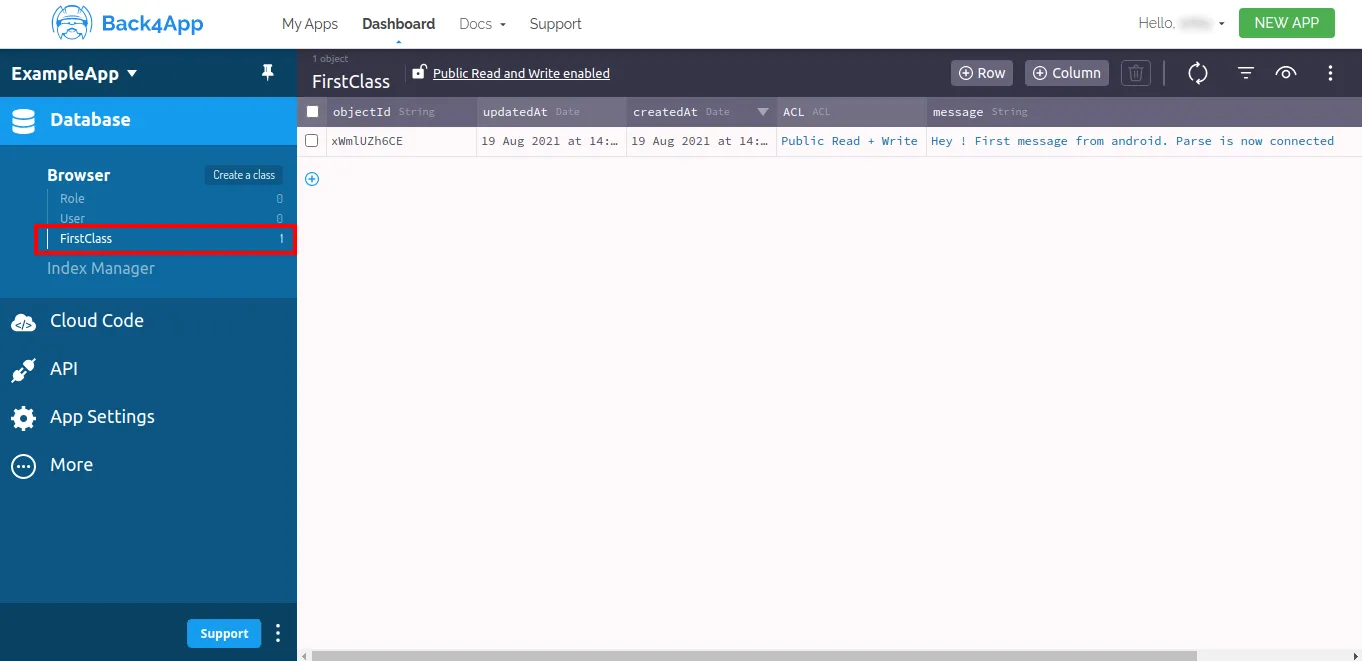
3 - Now click on Database > Browser > First Class. You should see the First Class with an object, as shown in the image below.
We completed the section! Now you have learned how to install the Parse SDK in your application.
Learn more by walking around our Android Tutorials.