In this guide, we will explain how you can use Twilio’s streamlined REST API to send WhatsApp messages easily. After completing this tutorial, you can use a cloud code function to send WhatsApp messages to your customers. So, let’s get down to business.
To complete this tutorial, you will need:
- An app created at Back4App.
- Back4App Command Line Configured with the project.
As you may know, the Facebook-owned WhatsApp has recently rolled out its first version of API for businesses to integrate and communicate seamlessly with customers. By using WhatsApp this service to the Bussiness API, companies can send customized notifications with pertinent, non-promotional messages, such as booking confirmations, appointment reminders, and delivery alerts, to their opted-in customers.
Twilio is a cloud communication platform that offers a robust feature to communicate and prototype with WhatsApp Bussiness API immediately. For now, the Twilio API for WhatsApp is in BETA and only allows you to send text messages to a WhatsApp user. In other words with that service, it’s not yet possible to send images, audio, videos and pdf files to users.
The feature used to send or receive WhatsApp messages to the user is “Twilio Sandbox”. In order to send messages to a user’s WhatsApp number, you will need to activate the sandbox first, and need to activate the number that will join your sandbox. In step 1, we will explain how you can activate your Twilio Sandbox for WhatsApp.
Note: The Twilio Sandbox has some limitations, and the major one is that you can only send to or receive messages from those users who have joined your specific sandbox. However, this limitation can be overcome if you enable WhatsApp using your own Twilio number. In order to activate WhatsApp on your own number, you need to submit a request for approval directly at Twilio Console.
In this guide, we will explain how you can use a simple REST API to send and receive messages directly on WhatsApp while employing as a middleware. We will write and implement a Cloud Function that will interact with a Twilio API to send those messages. Once this function will be triggered by a saving event, we call this function an AfterSave.
To create or access an Account in Twilio, check the links given below:
After logging in to an existing account, you will be redirected to your Project. But, if you are a new user, you’ll first need to create a project and select programmable SMS from products. You should now see the recently created project on your console. Next, you must click on the programmable SMS and select the 4th option WhatsApp Beta and then follow the Steps given in that section to activate the Twilio Sandbox for WhatsApp. Same as shown below:

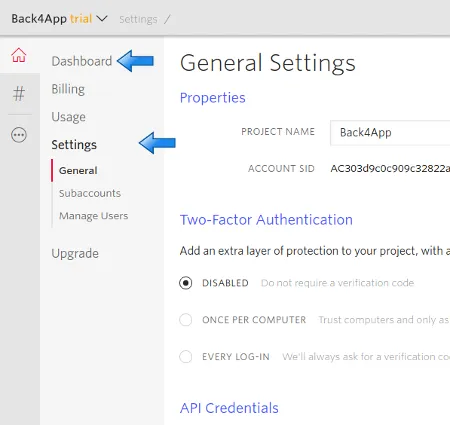
To find your Account SID and Auth Token, log in to your Twilio Account, go to your Dashboard and click on Settings. All the important information about your Project will be available in that section. Make sure that all these instructions are followed as shown in the image below:

Now, you can Copy your SID and Authentication Token for the Cloud Code.
After configuring the environment for the Command Line Interface in your computer, create a file called package.json, and inside this file, you need to install the Twilio module, like:
In this section, we will show you know how to work with the Cloud Functions.
We will build an afterSave Trigger function to activate and send the confirmation message that the object has been saved.
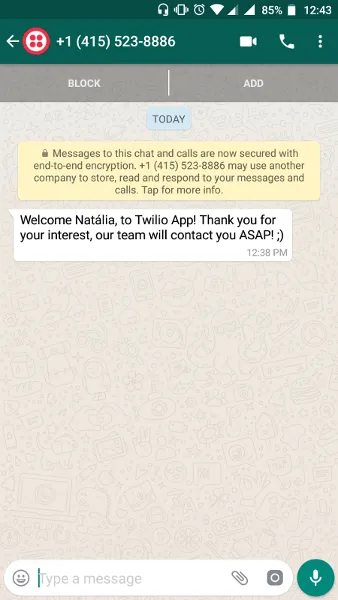
Now that we have created and activated the afterSave trigger, it’s time to test the function whether it’s working faultlessly or not. You can also test the function in client SDKs, but for now, we will use the REST API command to save a new User:
And the result will be similar to the screenshot below.

With the guide described above, you’ll be able to use Twilio with a Cloud Code Function in Back4App and send WhatsApp messages to your opted-in customers!
In case you need any help or a function/link doesn’t work, please contact our team via chat!